Java JFrame - Creating Main Windows
Introduction
So what is a Java JFrame? Many programs you see today have a window that is displayed which contains all sorts of menus, buttons, subwindows, dialogs, and the list goes on. A JFrame will allow you to create this main window that allows you to put all sorts of other graphical components in it. In this tutorial we'll see how we can create a JFrame and then take a look at all the cool things we can do with the JFrame.
Creating a JFrame
There are two ways of creating a Java JFrame, either by creating a variable that is the JFrame or by having our class be a subclass of JFrame. Let's start with creating a JFrame variable.

Here you can see we are creating a JFrame variable called window. You'll notice that if you try putting that line into your code, you will get an error saying that your program does not recognize JFrame. This is because you will have to import JFrame from the Java Swing library. It's not hard; just add this line to the very top of your code:

If you're using Eclipse, you can simply hit ctrl+shift+o to fix all of your imports automatically. This is handy so that you don't have to memorize how to import individual parts.
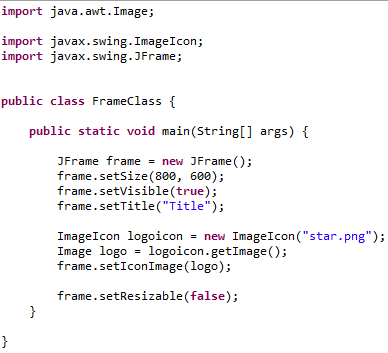
Now let's try seeing what the window looks like. But first, we must set a size for the window. We can set the size of the window by setting the number of pixels. The Java JFrame has a method called setSize which allows you to say how many pixels wide and how many pixels long the window should be.

This will set the window to 800x600 pixels. Now, we just need to make sure the window shows up. We have to make sure the window is visible because it starts initially as invisible. That is simple to resolve.

Try running the program and you should see a blank window pop up. Congratulations, you've built your first main window in Java!
The Java JFrame has a ton of features to explore that let us customize the main window. Let's experiment with some of the easier features.
Main Window Title Bar
We may want to have a title for our program. You can do that by using the setTitle method.

That will literally put the title you give it in the top bar of your window. Here's a picture of what you should see:

Now, let's get rid of that default Java logo that our main window comes with. Creating a logo is beyond the scope of this tutorial, but you can use any graphics application to do it. If you use a Windows computer, you can even just use Paint! Here's an example of a simple logo done in Paint and then saved onto the computer for use by our Java program:

Now that we have a logo, we can place it in our Java project to easily use it in our Java program. You'll have to place the image in the project where your Java code is. This is not that hard to do. You can drag the image into the project folder in Eclipse. You can also copy the file from your computer, then right click the project folder in Eclipse and select Paste. If you do it right, your project should look something similar to this:

Now, we can use the image in your code. To do this, we will use what is called an ImageIcon. All ImageIcon does is store our image as a variable.
![]()
Then, to add it to the frame, we need to get the image from the image icon and set it to the frame using setIconImage:
![]()
The image icon loads the image from your picture file. Then, we need to get just the image itself from the file by storing it in an Image variable. Then, we set that Image to the frame. The technical details are a bit more complicated, but rest assured this works!
Try running the program again and you'll see that you now have a custom icon for your window!
Controlling Window Size and Position
We may want to customize whether or not a user can change the way the window is displayed. For example, we may want to ensure that the user cannot resize the window. Right now you'll see that the user can still resize the window themselves by clicking and dragging one of the edges. You can try doing so and you'll see that the window can be resized at will. Let's change it so that the user cannot change the window size of the Java JFrame.

Now you'll notice that the window cannot be resized! The window always pops up in the upper left corner of the screen. Let's try repositioning the window so that it's centered on the screen. How can we know the size of the screen regardless of whose screen it is?
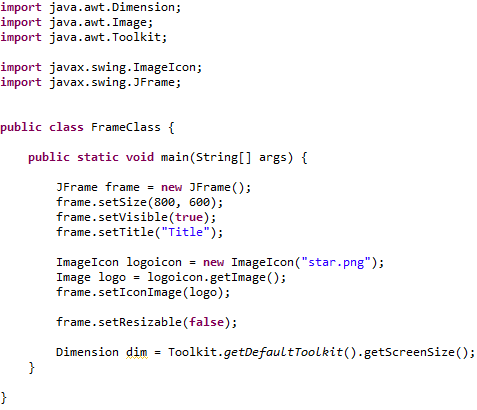
The way to figure out the size of the user's screen is to use what Java calls the graphic toolkit. The toolkit has tools that can figure out the size of your screen in pixels.

Don't forget the imports that you need in order to use both Dimension and Toolkit!
Because your screen has a length and a width, the screen size is stored in a Dimension object. A Dimension object has a bunch of properties but the important thing to note here is that a Dimension object stores both length and width. In the example above, the variable dim is a Dimension and we can use it to get both the length and the width that was given to us by getScreenSize().

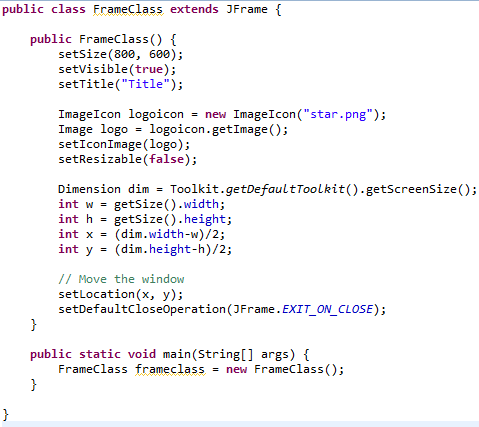
In the code above we grab the width and the height of the window and store them in two ints, w and h. Then, we take the width of the screen, subtract the width of the window, and divide by two and store that in x. We do the same with the height and store it in y. This is because we need to figure out the x and y coordinates that will center the window on the screen. Then, we set the location of the window by using setLocation. If you aren't sure about the math, that's okay. You can try using a ruler and proving to yourself that this indeed makes the window be centered no matter what. Otherwise, just keep this code handy somewhere so you can reuse it for your future programs.
Changing What 'X' Does
You'll notice in the top right corner that you can press X to make the window disappear. However, it does not end the program. If you notice in Eclipse, when you run a program, there is a stop button which indicates that your program is still running. This means to truly end the program, you have to press that stop button.
We want X to now make it so that the program closes fully. To do this, we need to set the default operation for the X button. Try writing this code:

Now your program will actually quit when you hit the X button in your Java JFrame.
Alternate Way to Create a Window
I had mentioned that there is another way of creating a Java JFrame. The other way is to extend your class to be subclass of JFrame. Here is an example of a JFrame done in the alternate manner.

The real only difference is that there is no JFrame variable anymore, now the class itself is the frame so all of the methods can be called straight without the variable. Don't forget to keep all of the imports you had before at the top or Java will not recognize JFrame, Dimension, Toolkit, etc.
That's all we have for the Java JFrame! You should be able to take this information and make a window for your application. In the next tutorial we'll see how to add a menu to your programs!
Have a question? Click here to contact us!


